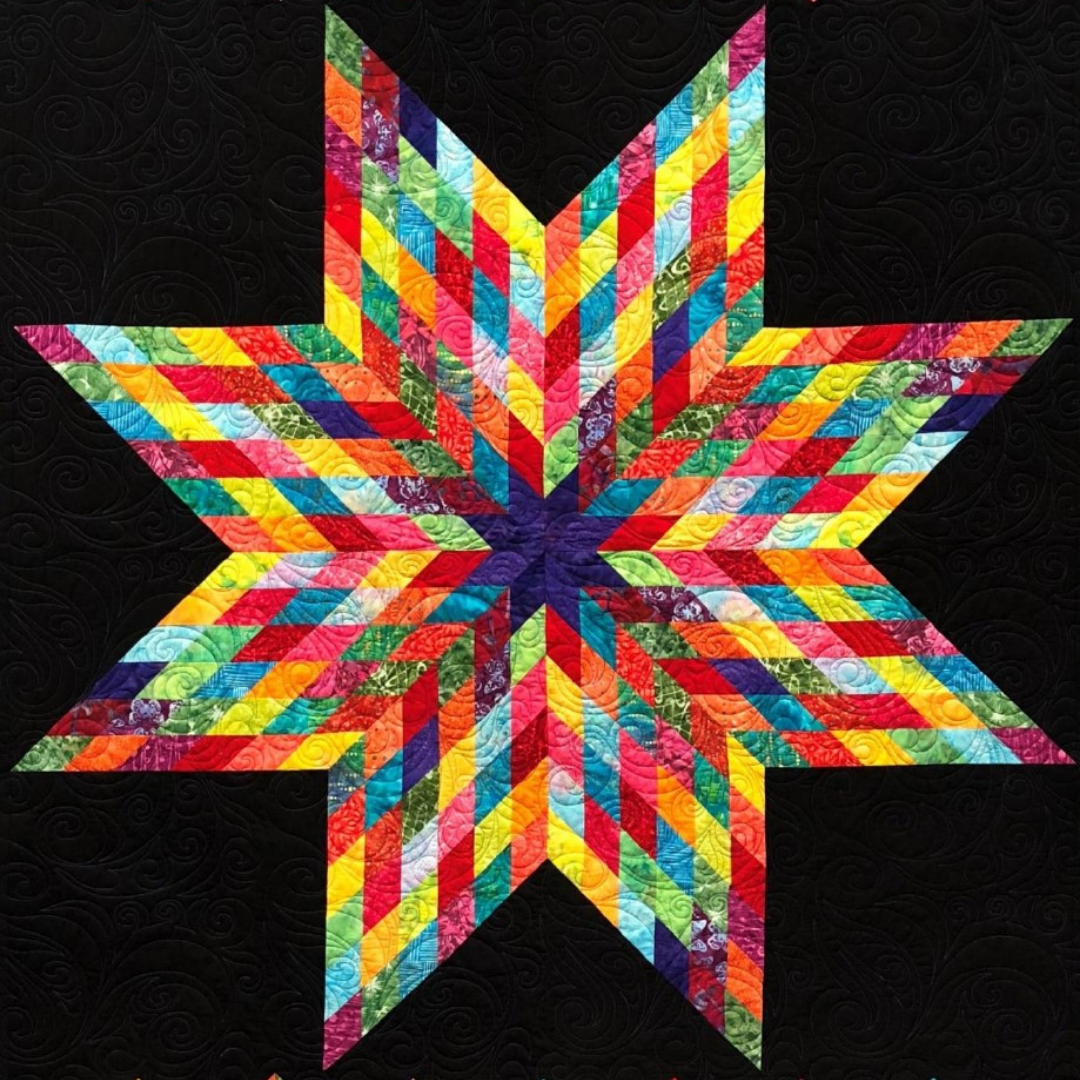
How To Make Lone Star Quilt
The pattern is made of small diamonds pieced together in eight sections. These sections join together to create the eight-point star.
The pattern of the star quilt is inspired by the Morning Star. The Morning Star is the last and brightest star in the eastern horizon before dawn. It is believed the Morning Star represents the way the spirits come to Earth and serves as a link between the living and those who have passed.
Today, we will show you the detail of how to make this Lone Star Quilt step by step. Let's get started!

Required Materials:
36 – 2 ½” Strips
Background and border: 3 ½ yards
Binding: 5 /8 yard
Backing: 3 3 /4 yards
Step 1:
Take 3 strips and sew them together along their long edges using a ¼” seam allowance and a small stitch length. Press seam allowances to one side. Repeat with remaining strips until you have 12 strip units.
* Designer tip: Pick out the darkest or most prominent color (I used purple) and put that color on one side (not in the middle) of a strip set. This will be used at the bottom tip of the diamond and will create the small, dark star in the very center of the quilt.
Step 2:
Fold one strip unit in half with right sides together and place one long edge along a 45 degree line on your cutting mat. As shown below, make a first cut near the edge but making sure you cut off the selvages.
Make your next cut 2 ½” away from your first cut. Make three more cuts so that you have 4 patchwork units that are right sides up, and 4 units that are right sides down.
Take all the units that are right sides up and put them in one stack, and all the units right sides down in another stack. Repeat with all the strip units. From the scraps left at each end cut triangles measuring 6” along the short sides to be used for the patchwork border. You can get 4 triangles from each strip unit.

Step 3:
We will be working only with the right side up strips first and making 16 small diamonds, and then stitching these 4 at a time into 4 larger diamonds. Using a variety of colors, take 3 different patchwork units and lay out into a small diamond. Stitch the 3 rows together being careful to match the seams. Press all seam allowances to one side. Try to iron along the straight grain of the fabric so you don’t stretch the patchwork. Repeat to make 3 more identical small diamonds.
Step 4:
Using the remaining right side up strips, Repeat step 3 to create 3 more sets of 4 small diamonds. Remember to place your prominent color (purple) at the bottom tip of one of the small diamond groups (see picture below).
Step 5:
Lay out 4 of the small diamonds to make a larger diamond - making sure to put the prominent color (purple in my quilt) in the very center. Stitch together into a large diamond. Repeat with remaining small diamonds to make a total of 4 large diamonds.

Step 6:
Repeat steps 3 thru 5 using all the right side down strips. You will now have a total of 8 large diamonds. Step 7: Background: Cut 4 squares 18”. Cut these squares along one diagonal from corner to corner to form 8 triangles. Cut 4 squares 12 3/4”. Cut each along one diagonal from corner to corner to form 8 triangles.
Use the diagram below for triangle placement and grain alignment.

Step 8:
Starting at the outside tip of the star, match the longer side of one of the 12 3/4” triangles to the pieced diamond and stitch. Both of these edges are bias so be careful not to stretch either of the pieces. Iron the seam allowances toward the triangle. Starting at the same pointed end of the star, match the shorter side of one of the 18” triangles to the pieced diamond and stitch. You may find that the background triangles are a bit too big for your diamonds, just trim off any excess background. Repeat with all the diamonds.
Step 9:
Take one upper (left) diamond unit and one lower (right) diamond unit and stitch together from the center of the pieced diamonds toward the outside corner. Be sure to match all patchwork intersections and make sure that the fabrics don’t stretch too much. Repeat with remaining sections and sew all four quarter sections together to make the quilt top. It is very important to press the quilt as flat as possible at this point as it may have distorted somewhat while stitching. I use lots of steam and try to press along the straight grain of the fabric.
Step 10:
Patchwork border: Take 2 different scrap triangles and stitch together into a square. Make 14 squares. Step 11: Background: Cut 8 squares 9” and cut across both diagonals to give you 32 triangles. Stitch triangles as shown below onto the patchwork squares. Each border has 7 patchwork blocks. Stitch the rows together, trimming off “dog ears” as you go. Trim the border to 7 ¾” wide, and trim off each short end leaving ¼” background. Cut 4 rectangles 7 ¾ x 10”. Stitch a rectangle onto each short end of the border. Measure your star quilt top and cut the pieced border to that length. Stitch a pieced border onto the top and bottom of the quilt.

Step 12:
Border - From background fabric - Cut 7 @ 2 ½” and sew on to all 4 sides. Quilt, bind, and enjoy!

